Preprocessing
Right before the actual run is solved, the model the user uploaded is preprocessed (cf. Fig. 6.1). This has a particular meaning for connections and can be described by two different phases:
- Initialisation of the
*_i_to_jcolumns.- Symmetrization of the
*_j_to_icolumns.
Step 1: Initialisation
Initialisation deals with the *_i_to_j columns.
This phase does not directly affect the *_j_to_i ones.
For each row of the model, any empty or blank cell within the *_i_to_j
columns will be set to 0.0.
Step 2: Symmetrization
Symmetrization deals with the *_j_to_i columns. This phase never
affects the *_i_to_j ones.
This “symmetrisation” process means that connections are assumed symmetric by default.
The user shall fill the *_i_to_j columns. *_j_to_i is not
mandatory. The empty *_j_to_i columns will be automatically copied
from *_i_to_j.
A connection may be partially symmetric. For example, a connection may have the same discharge coefficient (cp) for both ways, but different venting area. In this case, only the asymmetric values need to be filled.
Common examples
The following examples show the most common connections and propose the best way to idealize them.
Passive vent
Passive vents are the most simple connections. Passive vents are always symmetrical (although you may define unsymmetrical venting area).
Example: A connection (ID19) is a passive vent (symmetric) between volumes 2 and 7. The total vent area is 0.3m^2, with a discharge coefficients of 0.4. Such a feature is shown at Fig. 5.5.
The ESonix pre-process phase would prepare the full connection as described
below (in bold the default values determined by ESonix). Pay attention to the
symmetrization process to fill the _j_to_i columns.
| Column | User input | Preprocess | Actual input |
|---|---|---|---|
id |
19 | 19 | |
vol_i |
2 | 2 | |
vol_j |
7 | 7 | |
door |
Default to zero | 0 | |
opening_latency |
Default to zero | 0 | |
vent_area_i_to_j |
0.3 | 0.3 | |
opening_pressure_i_to_j |
Default to zero | 0 | |
opening_time_i_to_j |
Default to zero | 0 | |
cp_i_to_j |
0.4 | 0.4 | |
vent_area_j_to_i |
Default to vent_area_i_to_j |
0.3 | |
opening_pressure_j_to_i |
Default to opening_pressure_i_to_j |
0 | |
opening_time_j_to_i |
Default to opening_time_i_to_j |
0 | |
cp_j_to_i |
Default to cp_i_to_j |
0.4 | |
comments |
Default to null string | “” | |
ovar |
Default to zero | 0 | |
exvar |
Default to zero | 0 |
Standard decompression panel (Bi-directionnel)
Decompression panels are activated once the delta pressure pushing on it reach a target value. It is most of the time fully symmetric: the same delta pressure threshold triggers the mechanism and the same vent area is cleared.
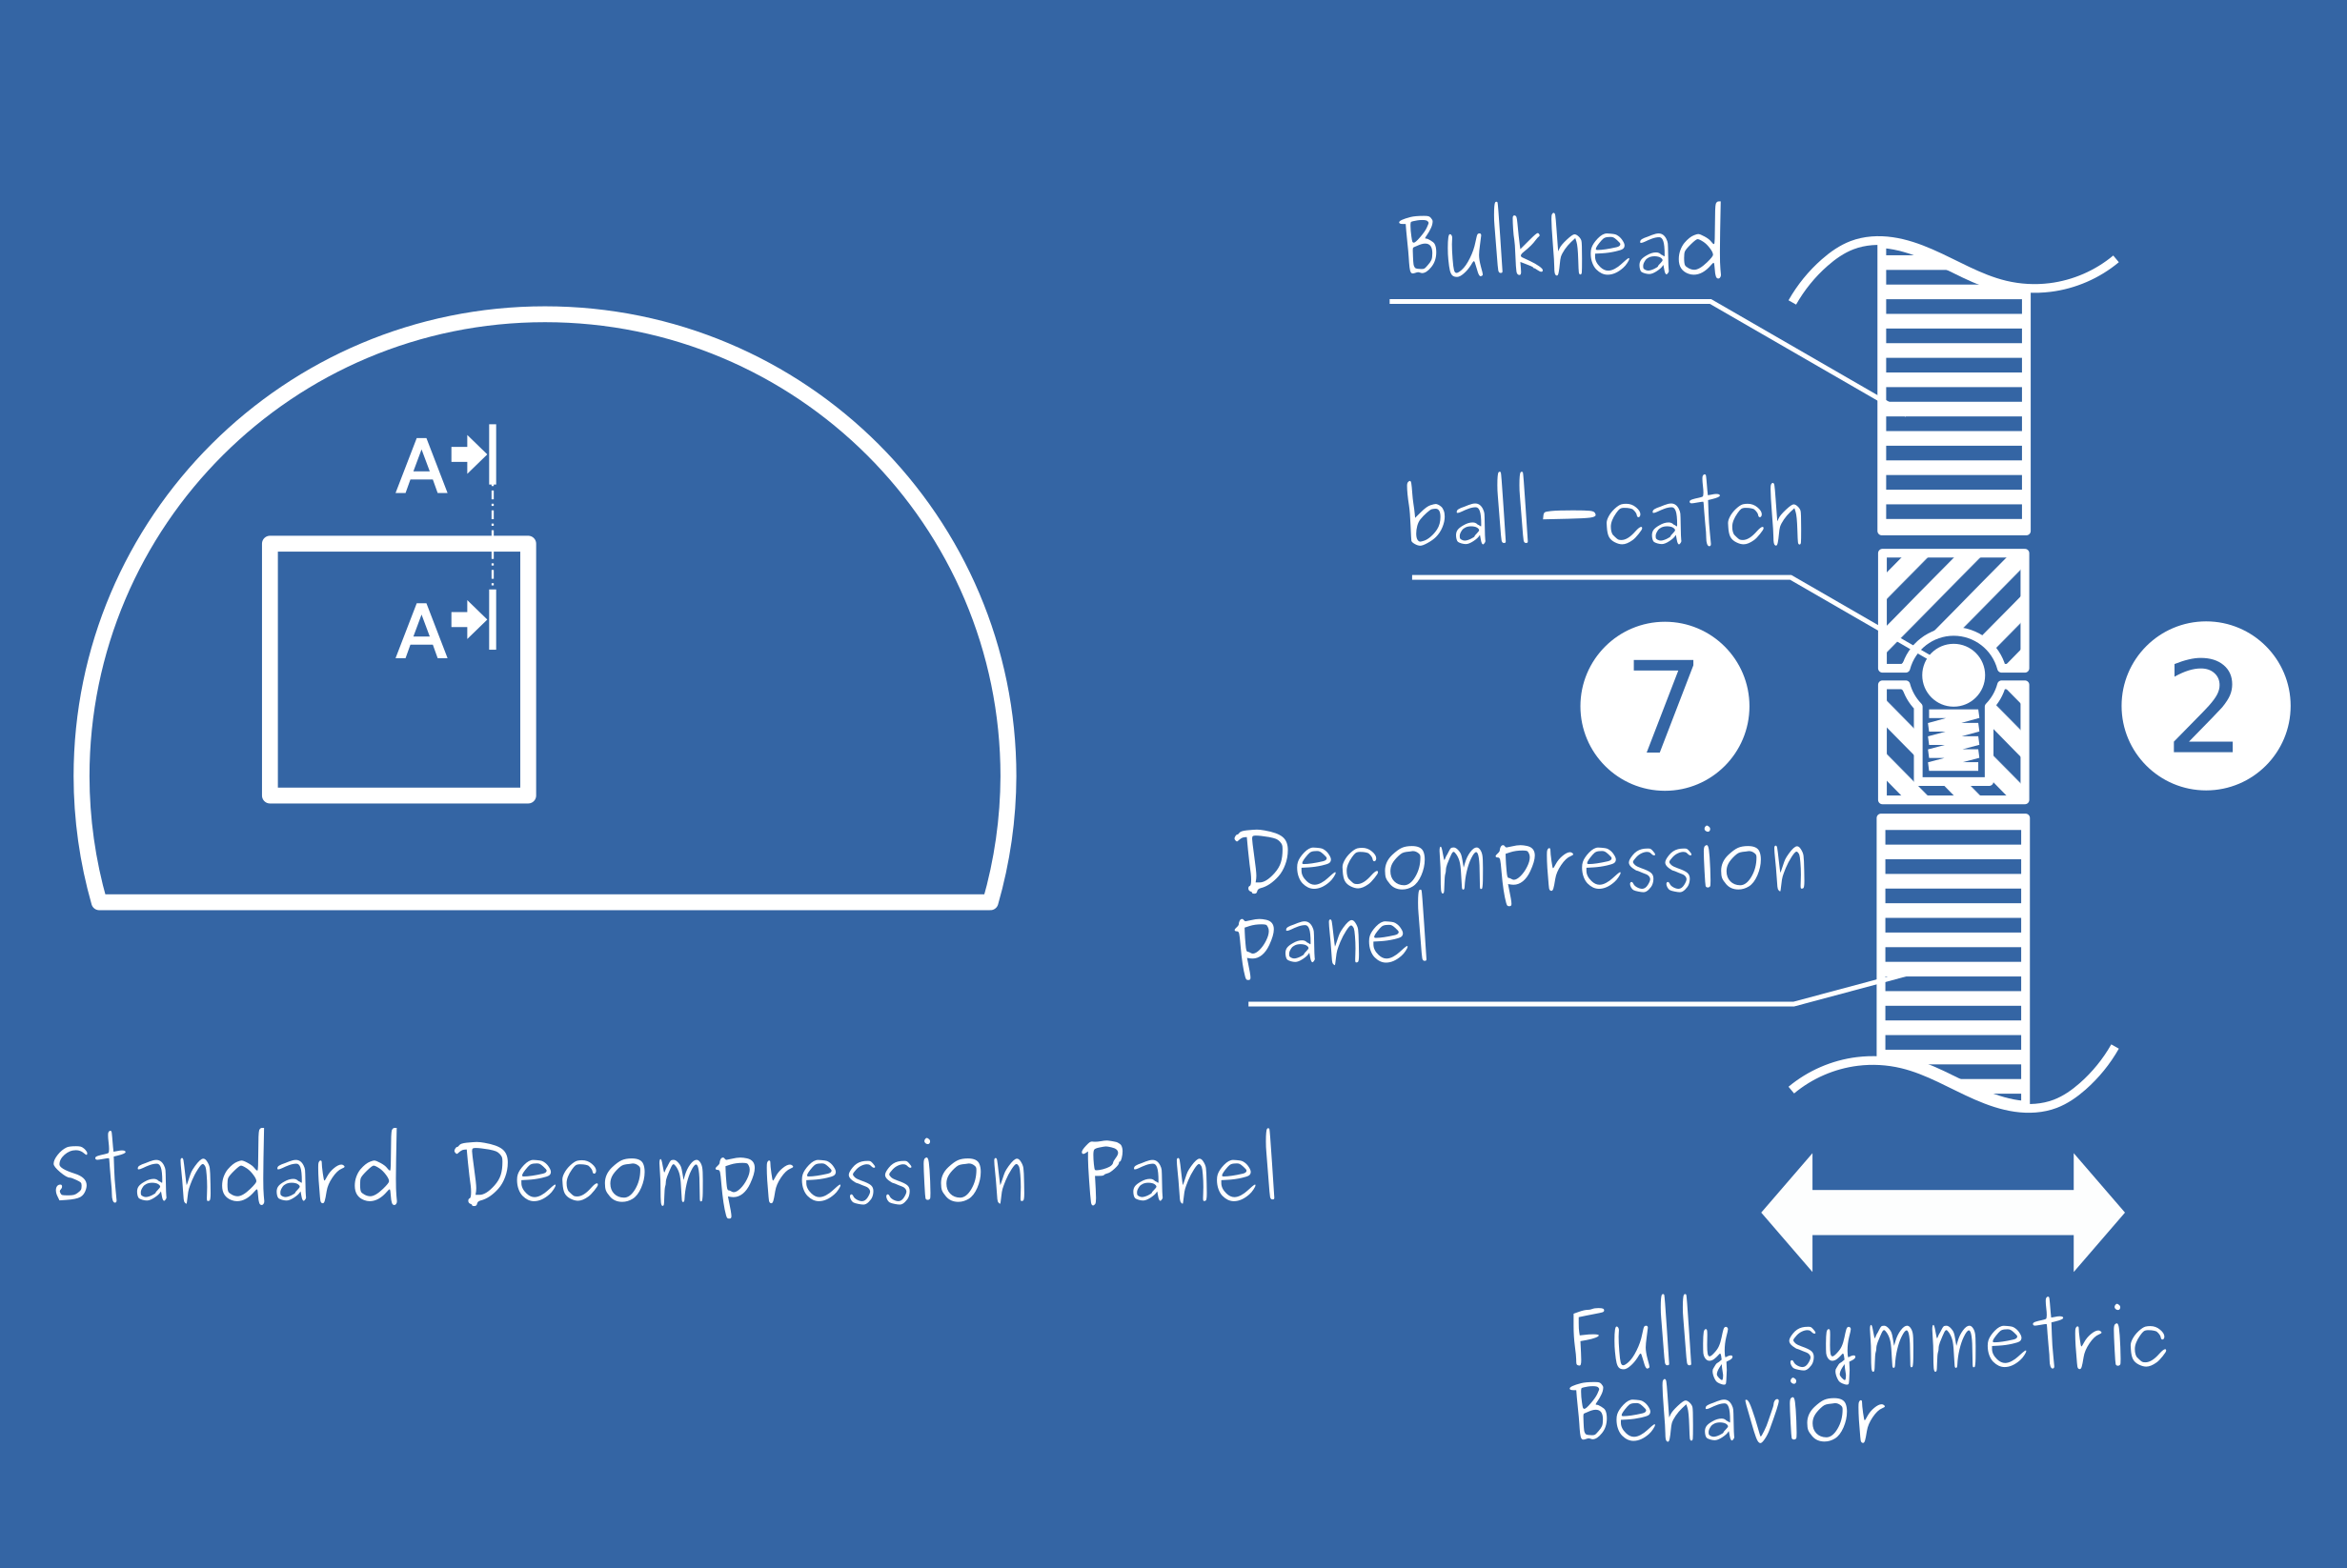
Standard Decompression panel between volumes 2 and 7 (designed with ball-catch for this particular example)
Example: A decompression panel defines the connection ID19. The total released area is 0.5m^2. The panel opens
for a pressure of 1.5bar, and is assumed to open instantaneously (opening_time = 0).
Such a feature is shown at Fig. 5.6.
The ESonix pre-process phase would prepare the full connection as described
below (in bold the default values determined by ESonix). Pay attention to the
symmetrization process to fill the _j_to_i columns.
| Column | User input | Preprocess | Actual input |
|---|---|---|---|
id |
19 | 19 | |
vol_i |
2 | 2 | |
vol_j |
7 | 7 | |
door |
Default to zero | 0 | |
opening_latency |
Default to zero | 0 | |
vent_area_i_to_j |
0.3 | 0.3 | |
opening_pressure_i_to_j |
1.5 | 1.5 | |
opening_time_i_to_j |
Default to zero | 0 | |
cp_i_to_j |
0.6 | 0.6 | |
vent_area_j_to_i |
Default to vent_area_i_to_j |
0.3 | |
opening_pressure_j_to_i |
Default to opening_pressure_i_to_j |
1.5 | |
opening_time_j_to_i |
Default to opening_time_i_to_j |
0 | |
cp_j_to_i |
Default to cp_i_to_j |
0.6 | |
comments |
Default to null string | “” | |
ovar |
Default to zero | 0 | |
exvar |
Default to zero | 0 |
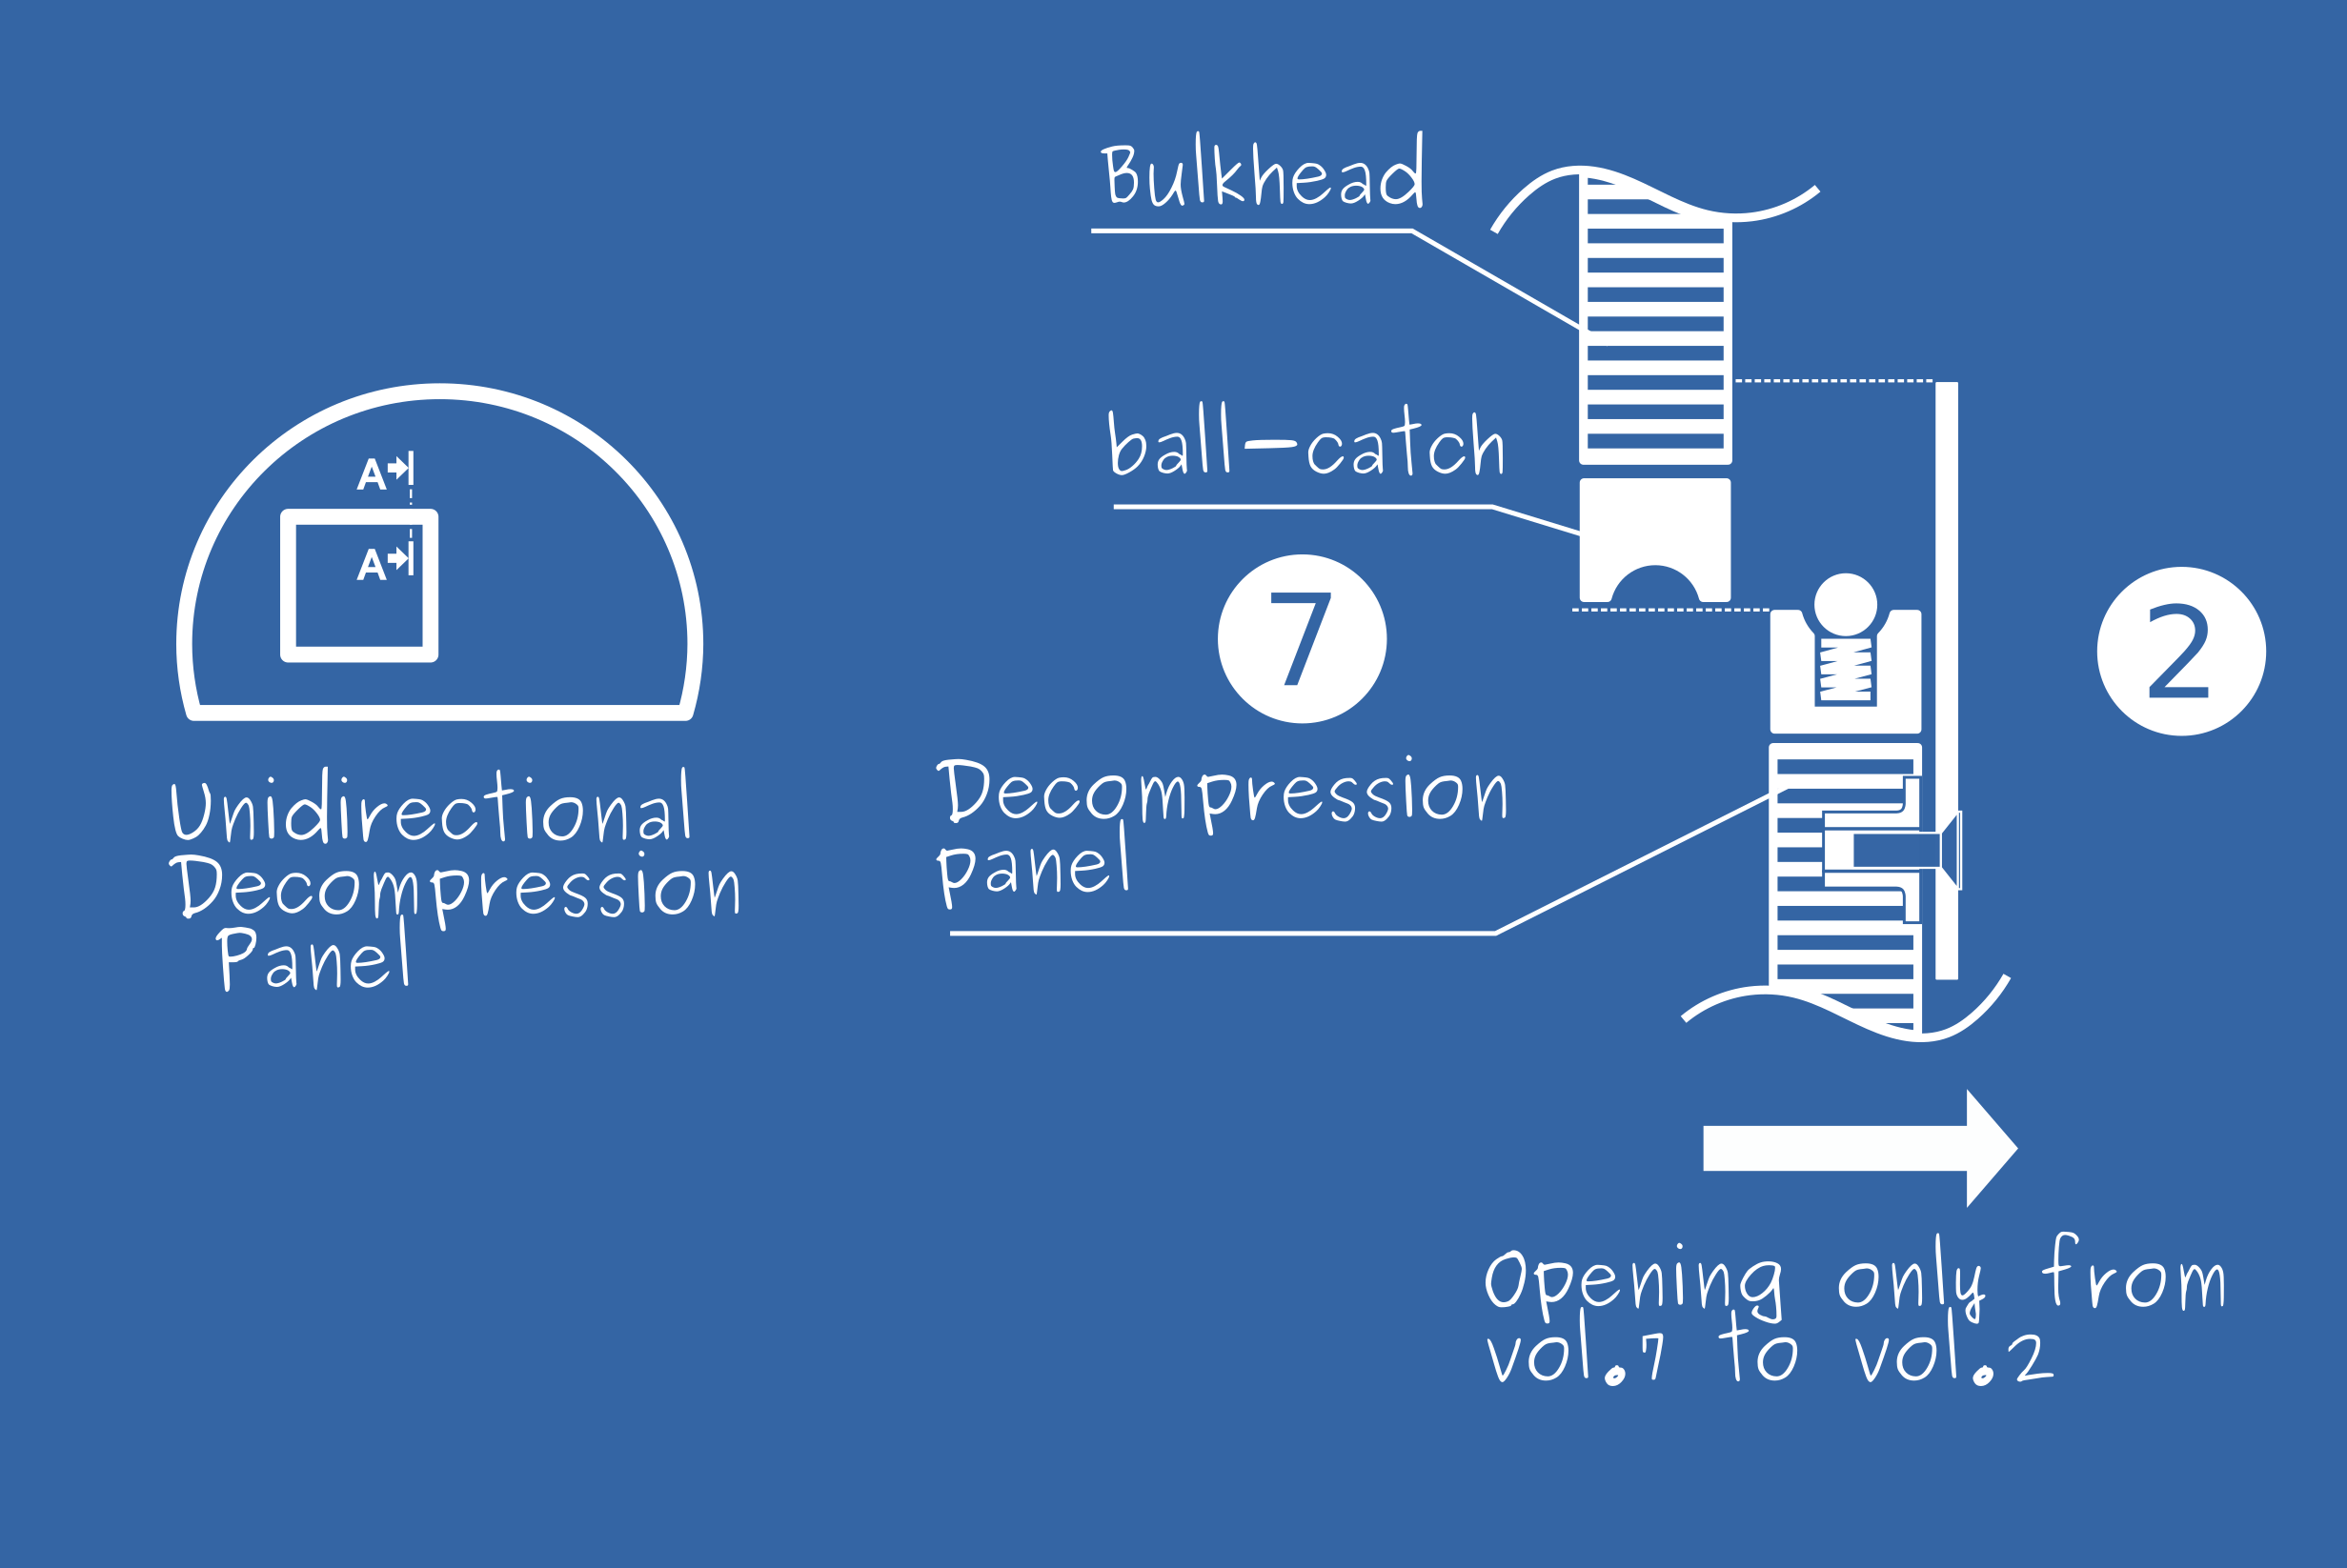
Unidirectional decompression panel
Unidirectional decompression panels are activated only for one direction
Example: Same example as above, but the panel can only open from 7 to 2. Such a feature is shown at Fig. 5.7.
One way to achieve this is to reduce vent_area_i_to_j to 0 (no vent area
from 2 to 7), and to set vent_area_j_to_i to 0.3.
| Column | User input | Preprocess | Actual input |
|---|---|---|---|
id |
19 | 19 | |
vol_i |
2 | 2 | |
vol_j |
7 | 7 | |
door |
Default to zero | 0 | |
opening_latency |
Default to zero | 0 | |
vent_area_i_to_j |
Default to zero | 0 | |
opening_pressure_i_to_j |
Default to zero | 0 | |
opening_time_i_to_j |
Default to zero | 0 | |
cp_i_to_j |
0.6 | 0.6 | |
vent_area_j_to_i |
0.3 | 0.3 | |
opening_pressure_j_to_i |
1.5 | 1.5 | |
opening_time_j_to_i |
Default to opening_time_i_to_j |
0 | |
cp_j_to_i |
0.6 | 0.6 | |
comments |
Default to null string | “” | |
ovar |
Default to zero | 0 | |
exvar |
Default to zero | 0 |
Warning
once the panel is open the air can freely flow in both direction. If the differential pressure inverts the air flow from “i_to_j” will be based on the actual calculated opened area with the discharge coefficient “cp_i_to_j”. Therefore this discharge coefficient should be always specified.
Note
another way of achieving a unidirectional decompression panel opening would be to set an artificially high opening pressure in the opposite direction.
Nested differential decompression panel
This particular design is sometimes useful to optimize a decompression layout.
Example. As shown in Fig. 5.8, a decompression feature (let say with ID 23) can open in both directions with the same triggering pressure, but with different area. This would be achieved this way:
| Column | User input | Preprocess | Actual input |
|---|---|---|---|
id |
23 | 23 | |
vol_i |
2 | 2 | |
vol_j |
7 | 7 | |
door |
Default to zero | 0 | |
opening_latency |
Default to zero | 0 | |
vent_area_i_to_j |
0.3 | 0.3 | |
opening_pressure_i_to_j |
1.5 | 1.5 | |
opening_time_i_to_j |
Default to zero | 0 | |
cp_i_to_j |
0.6 | 0.6 | |
vent_area_j_to_i |
0.8 | 0.8 | |
opening_pressure_j_to_i |
Default to opening_pressure_i_to_j |
1.5 | |
opening_time_j_to_i |
Default to opening_time_i_to_j |
0 | |
cp_j_to_i |
Default to cp_i_to_j |
0.6 | |
comments |
Default to null string | “” | |
ovar |
Default to zero | 0 | |
exvar |
Default to zero | 0 |
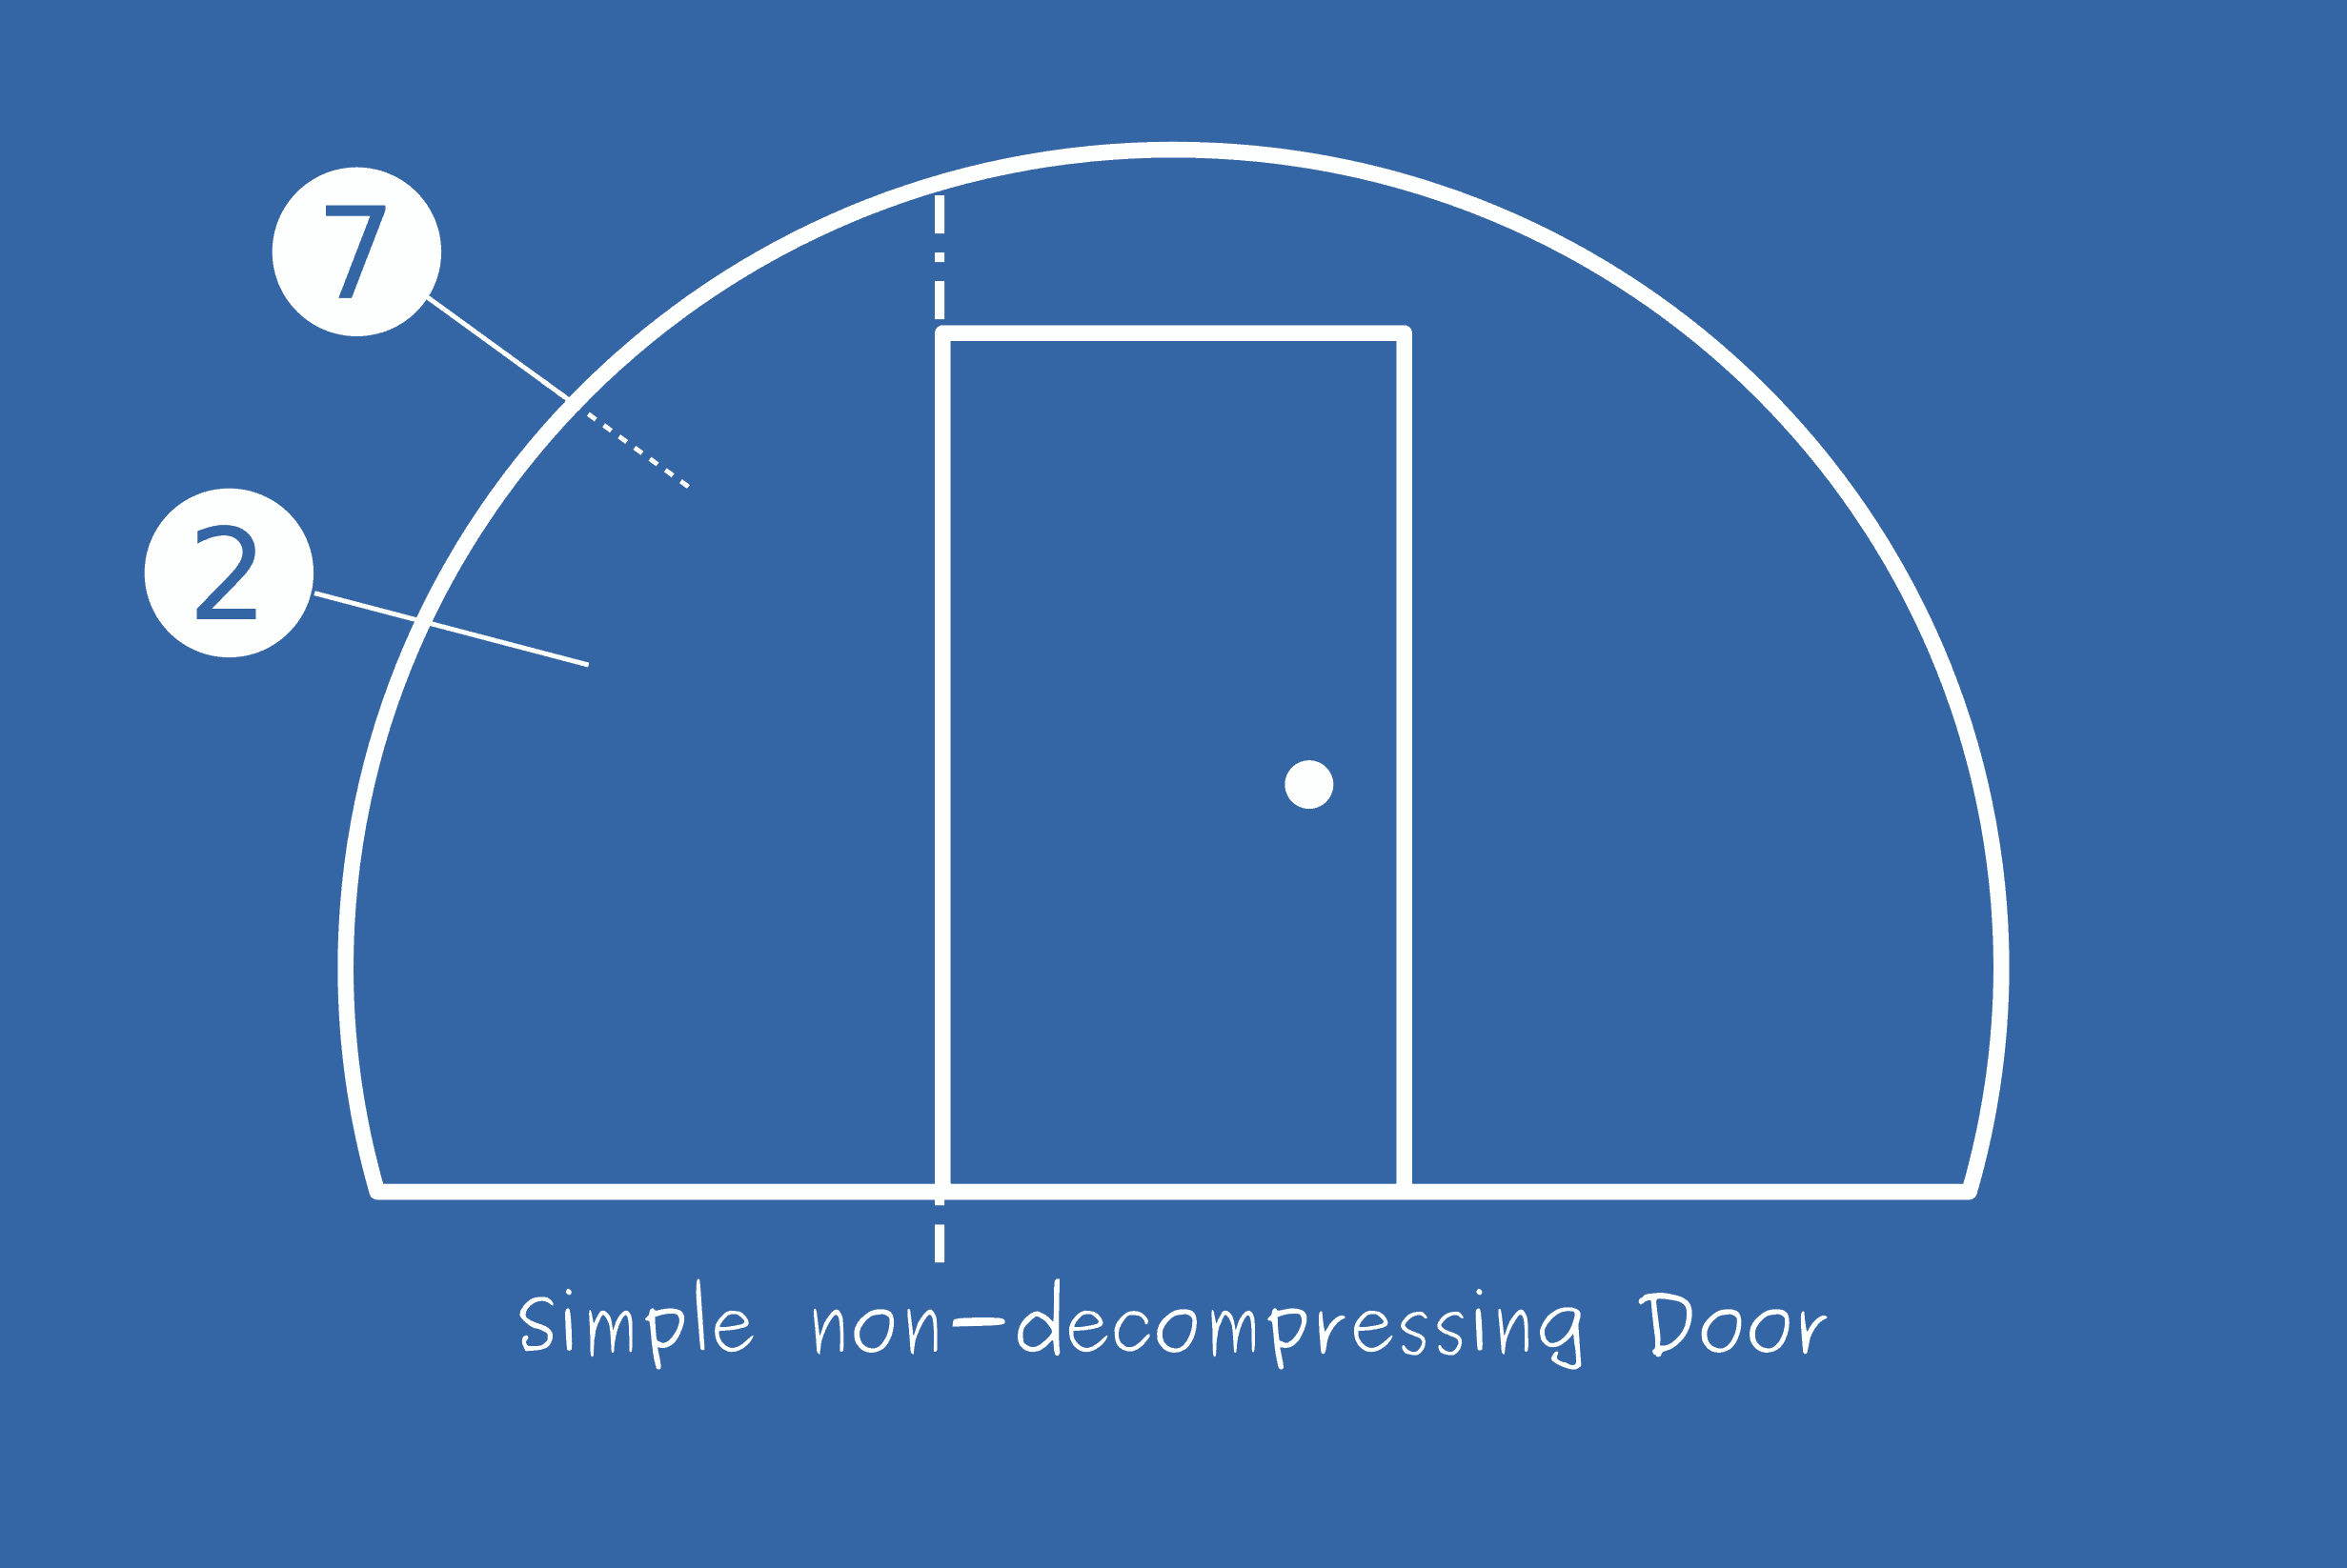
Simple non-decompressing door
A non-decompressing door is considered as a passive vent when the opened-doors configuration
is ran. No more data except door and cp_i_to_j are required (beside
id, vol_j and vol_j!)
Example: A simple 2.2m² door (let say ID9) connects compartments 2 and 7 (cf. Fig. 5.9).
Usually, such a big clean vent is assumed to have a discharge coefficient of 0.8. When the decompression analysis is ran with the closed-doors initial conditions, this venting is ignored (the door is closed and will remain closed) whereas for the opened-doors initial conditions, the full door is opened and will remain opened as a 2.2m² passive vent.
| Column | User input | Preprocess | Actual input |
|---|---|---|---|
id |
9 | 9 | |
vol_i |
2 | 2 | |
vol_j |
7 | 7 | |
door |
2.2 | 2.20 | |
opening_latency |
Default to zero | 0 | |
vent_area_i_to_j |
Default to zero | 0 | |
opening_pressure_i_to_j |
Default to zero | 0 | |
opening_time_i_to_j |
Default to zero | 0 | |
cp_i_to_j |
0.8 | 0.8 | |
vent_area_j_to_i |
0 | ||
opening_pressure_j_to_i |
Default to opening_pressure_i_to_j |
0 | |
opening_time_j_to_i |
Default to opening_time_i_to_j |
0 | |
cp_j_to_i |
Default to cp_i_to_j |
0.8 | |
comments |
Default to null string | “” | |
ovar |
Default to zero | 0 | |
exvar |
Default to zero | 0 |
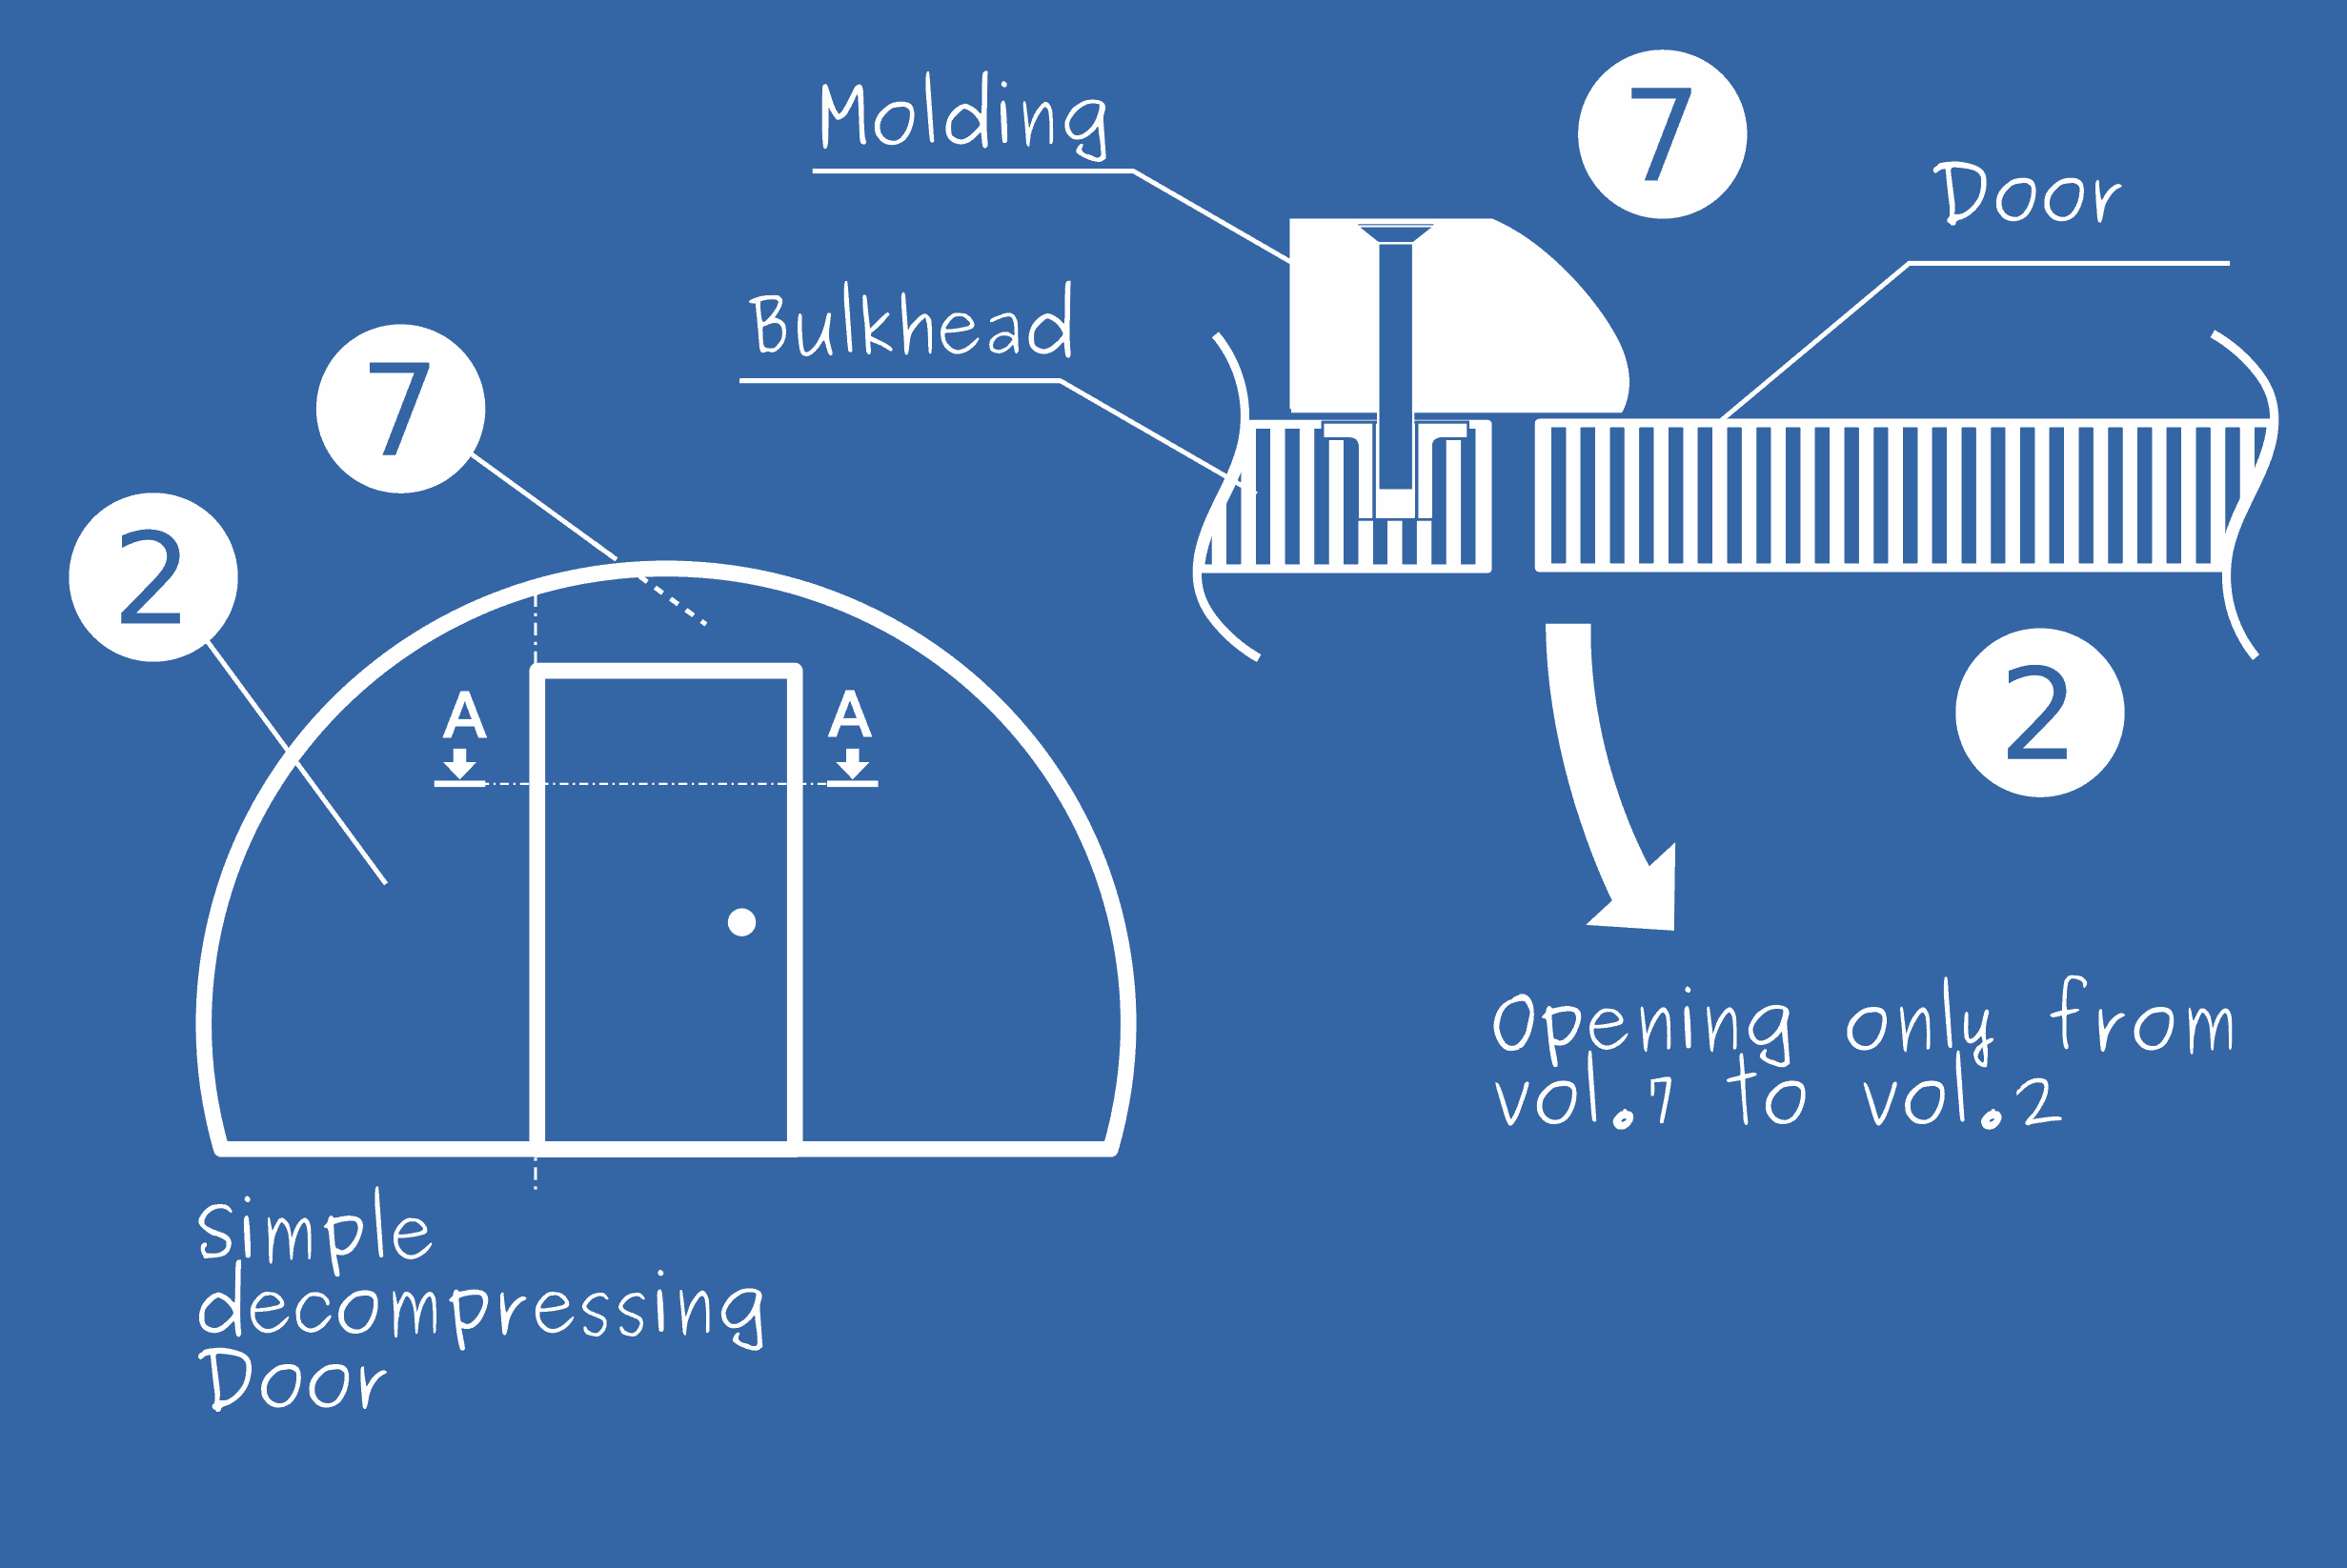
Simple decompressing door
A decompressing door is considered to clear its full frame area when the \(\Delta_P\) reach the triggering pressure. For an opened-door initial condition run, the decompressing feature will not be active, since the door itself is already opened.
This kind of decompression item is usually not symmetric: the static door frame allows the door to rotate only in one direction.
Example: The same example as above is used, except that the door is able
to open from 7 to 2 when \(\Delta_P\) reaches 1.5bar. Additionnally, an
opening time of 0.3 seconds will be used. Will still need to set the discharge
coefficient for i_to_j since the door will be opened for the opened-door
initial conditions.
| Column | User input | Preprocess | Actual input |
|---|---|---|---|
id |
9 | 9 | |
vol_i |
2 | 2 | |
vol_j |
7 | 7 | |
door |
2.2 | 2.20 | |
opening_latency |
Default to zero | 0 | |
vent_area_i_to_j |
Default to zero | 0 | |
opening_pressure_i_to_j |
Default to zero | 0 | |
opening_time_i_to_j |
Default to zero | 0 | |
cp_i_to_j |
0.8 | 0.8 | |
vent_area_j_to_i |
2.2 | 2.2 | |
opening_pressure_j_to_i |
1.5 | 1.5 | |
opening_time_j_to_i |
0.3 | 0.3 | |
cp_j_to_i |
Default to cp_i_to_j |
0.8 | |
comments |
Default to null string | “” | |
ovar |
Default to zero | 0 | |
exvar |
Default to zero | 0 |
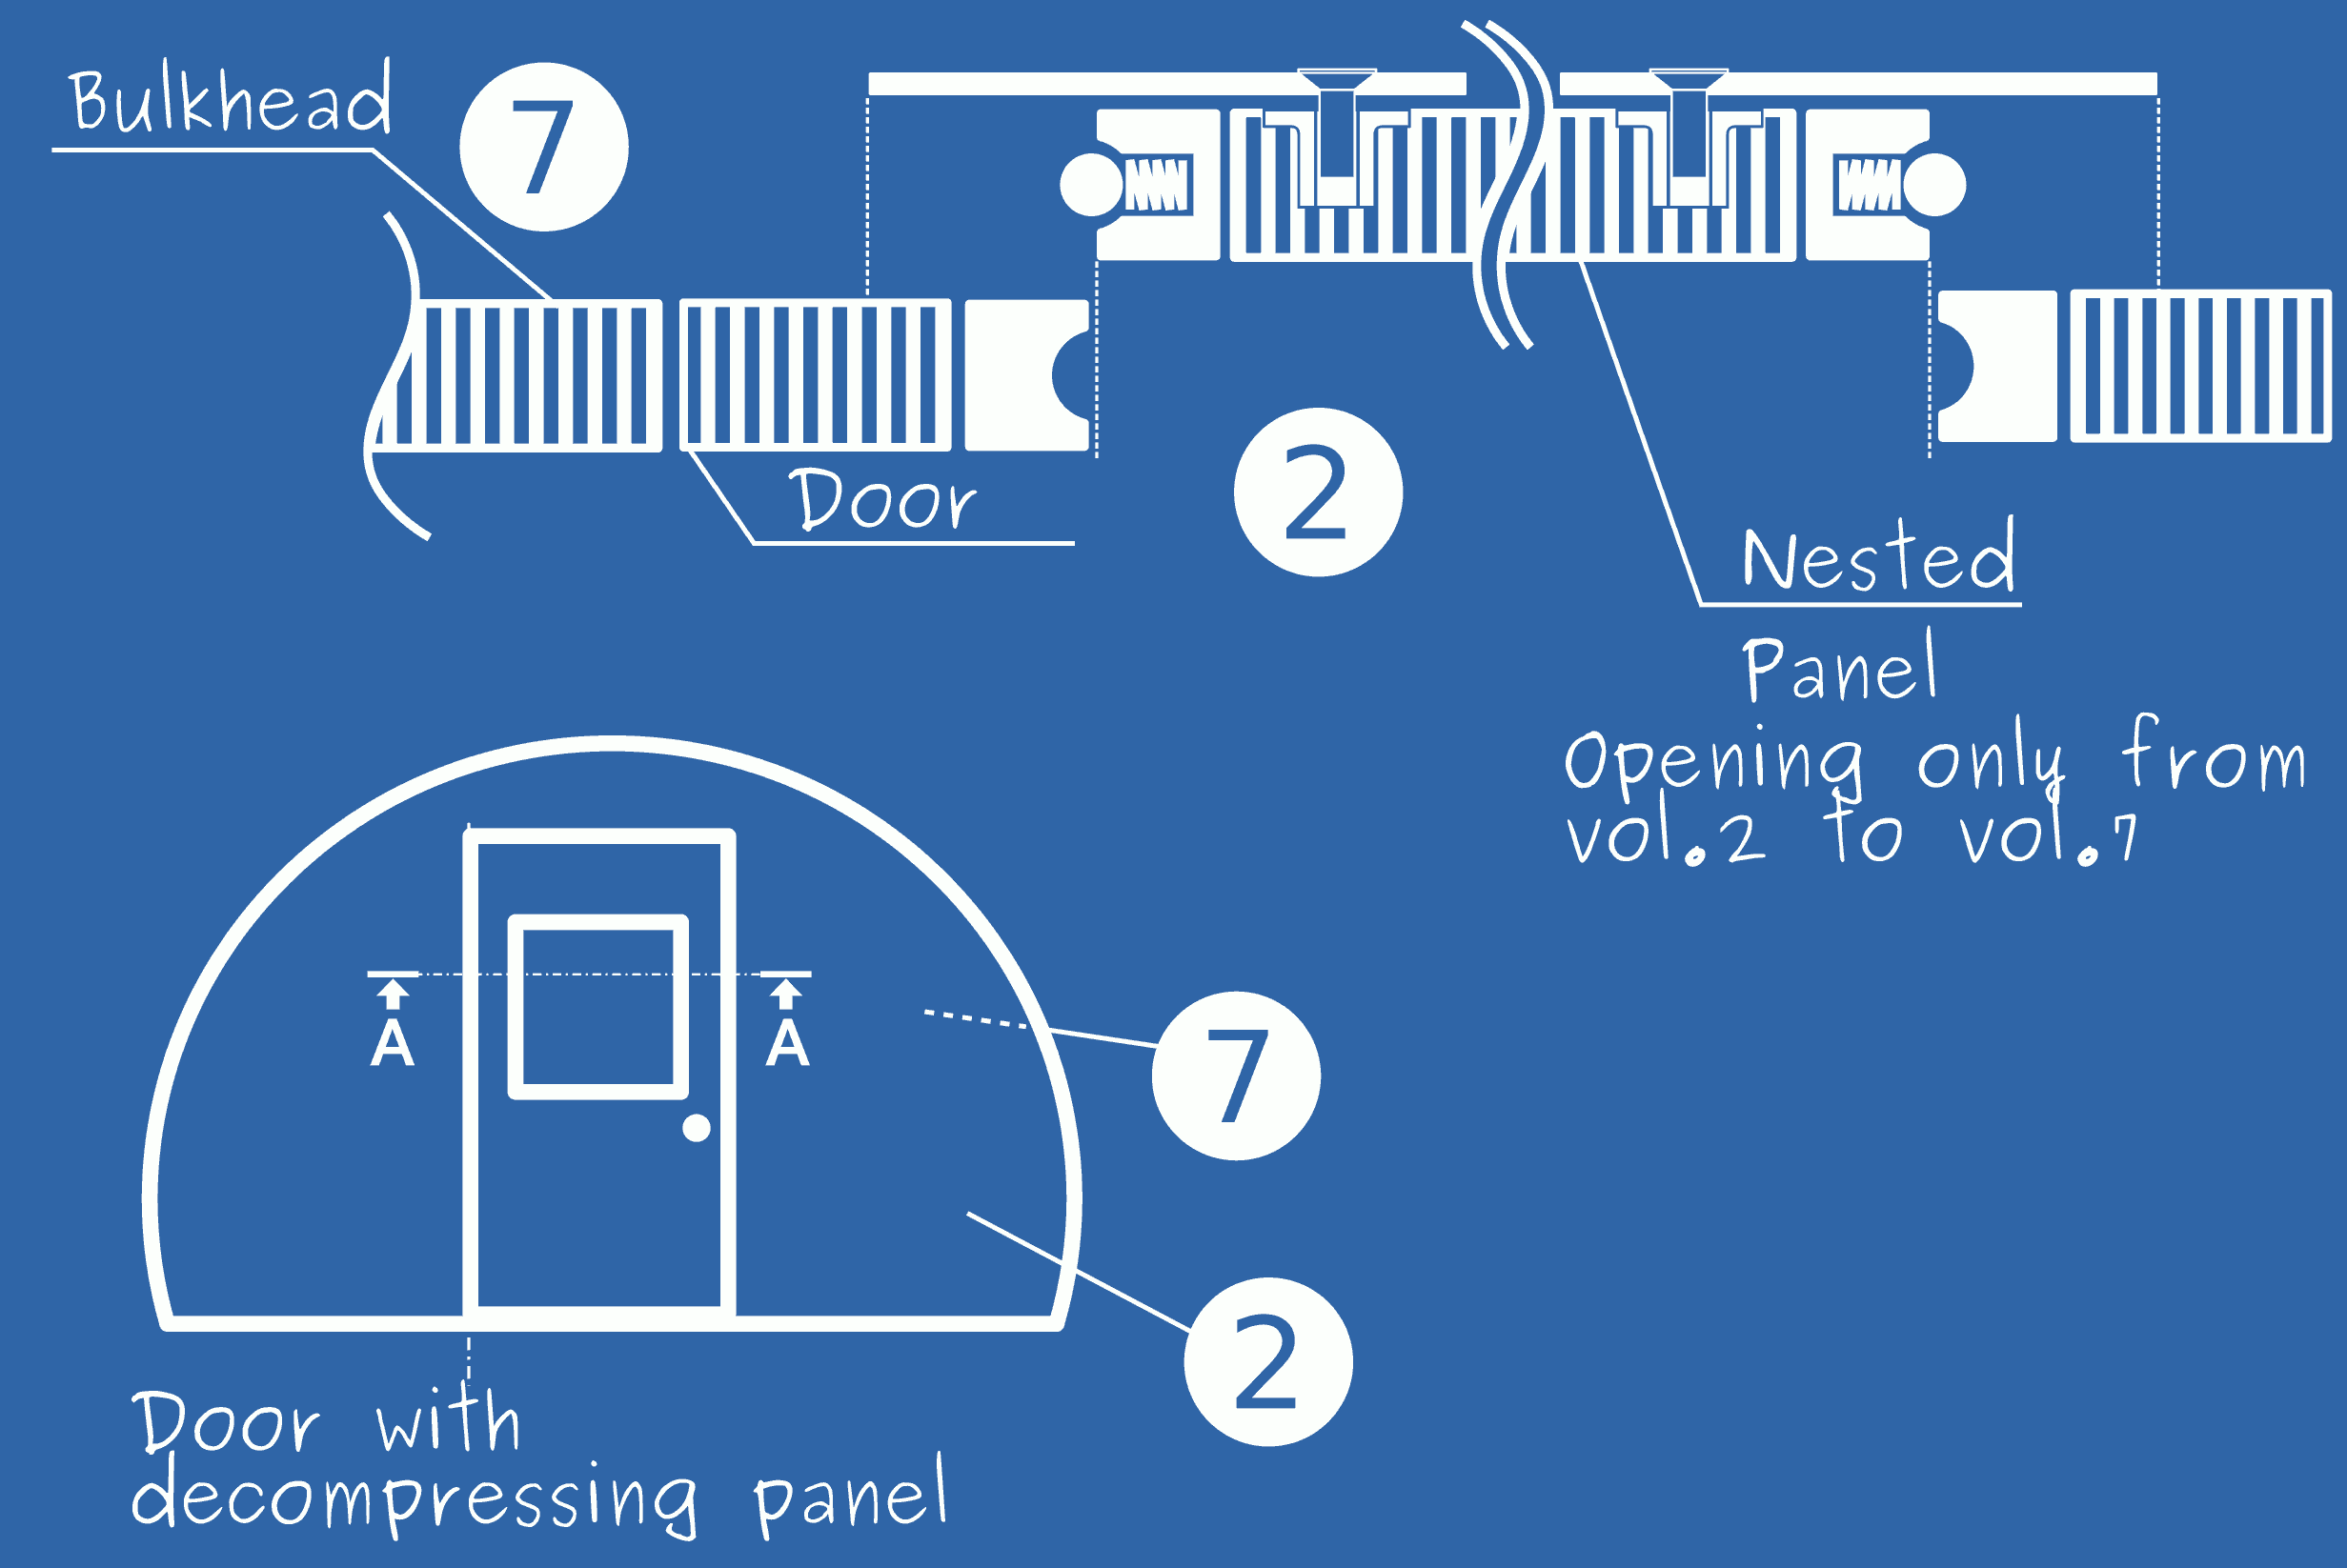
Door nesting a decompression panel
Contrary to the example above (Simple decompressing door), the door has no decompression mechanism, but hosts a nested decompression panel (cf. Fig. 5.11).
For illustration purposes, and to keep a certain level of complexity, the nested panel is considered blind –opening only from volume 2 to volume 7– which is not common.
The door itself will not be triggered with maximum Δp. However its 1.05m² nested panel will, only from volume 2 to volume 7.
Values for i_to_j data has to be filled, and values for j_to_i as well,
but set to 0 to avoid symmetrization (at least for the vent_area),
as shown in Table 5.11).
Warning
It is often a bad idea to define the panel as another item (another row) as the door. Indeed, in the latter case, during an opened-door load case, the panel will still be active and may be triggered, adding a new vent area that shouldn’t be!
| Column | User input | Preprocess | Actual input |
|---|---|---|---|
id |
9 | 9 | |
vol_i |
2 | 2 | |
vol_j |
7 | 7 | |
door |
2.2 | 2.20 | |
opening_latency |
Default to zero | 0 | |
vent_area_i_to_j |
1.05 | 1.05 | |
opening_pressure_i_to_j |
1.5 | 1.5 | |
opening_time_i_to_j |
0.3 | 0.3 | |
cp_i_to_j |
0.8 | 0.8 | |
vent_area_j_to_i |
0 | 0 | |
opening_pressure_j_to_i |
Default to opening_pressure_i_to_j |
1.5 | |
opening_time_j_to_i |
Default to opening_time_i_to_j |
0.3 | |
cp_j_to_i |
Default to cp_i_to_j |
0.8 | |
comments |
Default to null string | “” | |
ovar |
Default to zero | 0 | |
exvar |
Default to zero | 0 |

